Complete startup guide to start a blog and begin content marketing

Tl;dr- A step by step guide to start a blog and build in marketing automation so you don’t make any silly mistakes!
You need to grow, get customers and make money. But, gosh darn that is expensive! Spending money on AdWords is easy, it’s comfortable and there are loads of data. But your CAC/LTV doesn’t work.
You know deep down you need to start a blog. You need to get in the content marketing game, building real relationships and authority with your potential customers and cementing your brand engagement with your current ones.
You read it works fab for everyone else, but yet you just haven’t made yourself get off your arse and just do it, have you?
Trust me, I know. It seems like so much effort to start and then there is this whole writing thing! But I did it, and I sure as hell wasn’t a writer, nor knew a line of code.
There is a TONNE to learn, but over the years having messed up everywhere and done some things right, I know how to teach you everything you need to know to just get it done. Today. Now. You can do it. Commit.
Yes, you ‘can’ set up a blog in under 5 mins, but let’s face it, there is a lot more to it than that.
I’m going to teach you the full version. I’m not going to waste your time explaining rubbish like ‘why WordPress makes sense.’ I’m also cheap as a Scot, so I’ll tell you exactly where to spend money and where not to. Once you know more, you can decide where else you want to spend money.
There are affiliate links in some of the links. That means I make cash if you buy stuff I recommend. It doesn’t cost you a dime though, so there is nothing sketchy going on. If you love the blog, then I’d really appreciate you buying through them. It’s literally free money, so I would be dumb not to! As you can see from the screenshots, this is exactly what I use and pay for too.
Content marketing matters
You want traffic. You need SEO. You need to build authority to get customers to buy. You want to make it easier for your sales team to close. You want to increase your chances of getting speaking gigs at the big events. You want investors to have read about you. You want to build your brand…
Do I need to go on? Keep reading. Don’t get in the way of your own success!
The 13 steps
- Get a great domain name
- Set up your web hosting with amazing customer support
- Sort DNS
- Install WordPress
- Get your HTTPS set up to make Google happy
- Get a pretty theme so things look fancy
- Speed optimise so readers don’t bounce
- Install chat on your site to engage readers
- Set up Google Analytics / Google Tag Manager
- Implement marketing automation to build an email list
- Write content
- Set up lead magnets
#1 Get a great domain name
I presume you have a site name already, right?
No? Ok, well you need one.
So spend time and figure out something you want. I recommend a .com, but if you really can’t find something then try a .co or .io if you are in a nerdy space.
You can use a tool like Domainr or Namemesh for search help.
Another super tip is to use Namechk and see if your social media accounts are free too? Awesome time saver.
Now, enough messing about. Write down the domain name that is available and that you want to buy.
You need to buy it now. Yes, you can go to one of the billion sites around, but they don’t really matter since you won’t be hosting with them. Domain names are cheap in the scheme of things and you’ll waste time to save a couple of dollars you could spend hustling.
To make things as simple as possible (and eliminate some complicated stuff like changing your domain name servers) we are just going to purchase it with the server host. Head to Siteground now.
If you have bought your domain name somewhere else, don’t worry, I’ll explain what to do later.
#2 Set up your web hosting with amazing customer support
Your host is basically the place you save all your website stuff and that shares that content to the screens of your customers. It is really important and you don’t want to mess about with this.
I used to use Hostgator and wasn’t happy. Customer care does the bare minimum. I’m not a super nerd so I need actual help when things don’t work (and you will need help). FML.
I found Siteground and have never recommended a company for having such awesome customer care before. The guys are one word: AWESOME. They have helped me with SO MUCH. For a while, I was on a first name basis with some of the reps. Siteground has live chat, so there are no BS tickets where you wait days. They respond in around one minute tops. Seriously. They are the bomb. They will even set up WordPress for you…
I bet you’re itching to get creative and ‘look around’ right? Don’t bother. Let me just tell you.
I spent a bunch of time looking for others- about a whole feckin day. A lot of bloggers recommend Bluhost, but I read bad things about them so I passed. Now, if you are funded or have some cash to splash then WP Engine is recommended for WordPress sites. It is a lot more expensive than Siteground, so if you just want to get started I highly recommend you just follow my instructions and can think about getting fancy once a tonne of people are already reading you ;).

Click Sign up

Click ‘get a new hosting account.’
Now, time to add the domain name you are going to use for the blog:
- If you need a new name, leave the first setting and then add the domain name in the box. Change the suffix to whatever you are using, but .com is still the best idea!
- If you have a domain already, change this to ‘I already have a domain.’ You add in your domain here and this becomes the principal account associated with your account. Additional domains are secondary account domains. Don’t stress out here, it doesn’t really matter.

Now you need to pick your hosting plan. Tl;dr: Get GrowBig
I’ll make this really simple:
- You are poor / cheap / testing: If you just want to get going click StartUp
- You want the best value: I chose GrowBig because I wanted to be able to host more than one domain and their caching is better so your site loads faster. You also get increased server processing time, which is handy in case something goes wrong amongst other things 😉 Your server is so important I would just get this. It’s only the price of a round of beers anyway. You may feel sticker shock, but trust me, having done this for a few years, I’m happy to pay this or more

The next question is where are most of your customers based? If you are in the USA, click Chicago. If in the UK press London. What this means is that the customers nearest to the server will have better speed. It’s not a massive deal, but pick the closest to where you think your customers are.

Now click the plan you want. As I said, I use GrowBig.

Now, what is the period of the contract? You can pick one year if you want. I picked 2 years so I don’t have to mess about with admin so often. As I said, I love these guys, so I am not going anywhere.

This bit is about your domain name. You don’t have to click Domain Privacy but I do. There is an ICANN requirement to share a bunch of details about you including your email. ANYONE can do a WHOIS lookup and get your contact details! WTF? I know.
Yes, it’s some more shekels, but up to you buddy. I do this. So if you look me up you see an anonymous registrar.

Payment time. Input your credit card details.
Press accept to the terms and then… pay. Boom.

#3 Sort DNS
Now you are set up, you need to sort out your DNS (domain name servers).
If you did what I said and purchased your domain name along with your SiteGround hosting account, there is no need for additional setup because it is automatically configured for you. Nice.
If you want to nerd out… you can manage the administrative aspects of your SiteGround domain (like DNS settings and contact information) by going to the User Area → My Accounts → Manage Domain.
Setting Up an External Domain
If you already have a domain name, registered elsewhere, you need to point the existing domain to your SiteGround hosting server. You have to change your DNS in the settings of your registrar.
You can find the correct SiteGround nameserver records in your User Area → My Accounts → Information & Settings → Account DNS:

Each domain registrar may have a different interface of their control panel, so if you don’t know how, it’s best to contact your registrar’s support team to give you more information and help you with the next steps. If you don’t know which is your domain registrar, you can find it by doing a simple WHOIS check.
It’s really simple to do. I bought my domains years ago with GoDaddy (Don’t like them at all, tbh). To change you go to Products and click on DNS:

Then you see the nameservers. Click change and copy/paste your DNS from Sitegound as the picture earlier.

See my DNS point to Siteground?
#4 Install WordPress
Now you have two options:
- SiteGround team can do it for you
- You can just get it done. I love to learn and be self-sufficient, so just do this and learn
Feck it, roll out the red carpet
Installing WordPress with SiteGround the lazy way. The support team will do it for you for free! After you sign up for hosting, log in to your account and select the “Support” tab.

Scroll to the bottom and click ‘here.’ Then chat to them and ask them to set up WordPress. Done.

Learn to do it myself
Really, it’s not hard to do yourself.
This tutorial explains how to use Softaculous to install a WordPress application on your site. It will take only few minutes and literally no advanced skills to have a fully functional WordPress instance in your hosting account.
First, login to your cPanel account and find the Softaculous icon under the Autoinstallers section.

Once you click on the Softaculous button, you will be redirected to a page where you have to choose the application you want to install. Click the WordPress icon in the list of applications.

On the next page, click the Install tab at the top of the page to specify that you want to perform a brand-new WordPress installation.

Then, enter the required fields for your site – title, description, administrative username and password, administrative e-mail etc. and click on the Install button. You should use a strong password to make sure your admin area is secure from brute-forcing attacks.
Now one area you might wonder about is the protocol. You want to use httpS. We are going to have SSL security and Google likes HTTPS sites these days. You will install in the root of the directory, so leave the directory field blank.

Click Install below:

The automated installation process will proceed and once done you will see a page informing you of the successful completion of the installation. You can use the Administrative URL link to automatically log in your newly installed WordPress application:

BOOOOOM! Easy right? WordPress is installed. You just need your username and password you input to be able to login now. If you want to test now, go to YOURNAME.com/wp-admin. Add your username and password and you are in!
#5 Get your HTTPS set up to make Google happy
Most guides stop here and forget all these other important things. You are smarter than that, however.
You want to have a HTTPS site because as of 2018 Google is raly pushing for it. So it may impact your rankings in search.
Let’s Encrypt is a certificate authority that provides people with the security certificates, needed to enable HTTPS (SSL/TLS) for their websites. Let’s Encrypt certificates are available to you for free and they automatically issue them for all domains hosted on their shared servers.
To manage Let’s Encrypt certificates log into your cPanel → Security tab → Let’s Encrypt.

In this interface, you see your active certificates, install new ones, cancel them, enforce HTTPS for your website. With SiteGround, your SSL certificates will be renewed automatically, so you don’t have to do it manually every 3 months.
To switch your website to work completely over an encrypted HTTPS connection with a click for all your apps, log into your cPanel → Let’s Encrypt → Security tab → enable the HTTPS Enforce option.
You are done. If there are any issues. Just contact support and they will fix for you. They did it for me 😉
#6 Get a pretty theme so things look fancy
Now you need a Theme. These basically offer a lot more functionality and prettiness than WordPress provides. You can get a free one from WordPress, but don’t bother. Again trust me, I’ve been through all of this and looked for ways to not spend any money.
So the Tl;dr is you are going to pay about $45 for a good theme. End of question.
The one I use for all my sites is called X-Theme. It’s not totally the easiest to use if you want to do fancy things, but I learnt right? 😉
The best thing about the theme is the visual builder. A lot of themes use Visual Composer and I think that is WAY TO HARD! X-theme is easy to use if you want to create fancy pants custom pages. This is one of the top 3 best themes on the market. You could go with others, but I just keep using this personally.
Click here.
Buy it. It is $45 well spent for what you get.

Now you want to download it. You can see I’ve got it more than twice below!

Then look for the zip file which has all the data in it, but not the manuals and stuff. You upload the zip file. Don’t unzip it!!
In WordPress, click on Appearances then Themes

Click add new at the top

Then upload theme

Now upload the ZIP. It will not work otherwise.

Now press activate.

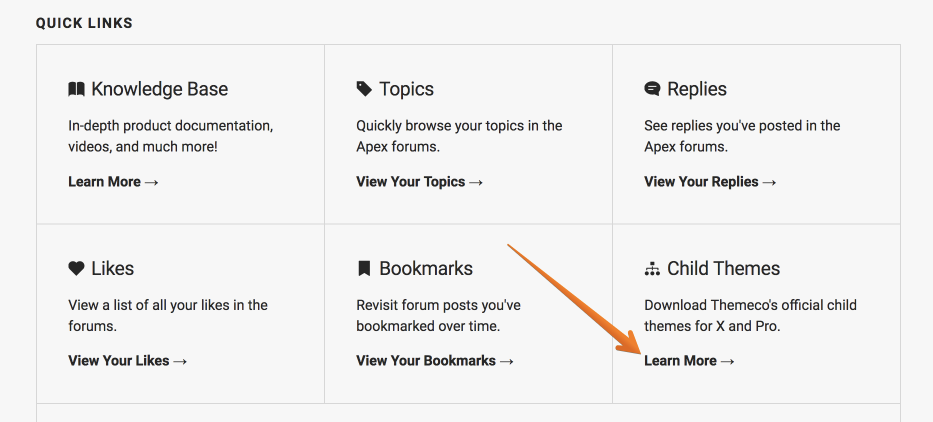
The next trick you want to do is to install a child theme. This means when WordPress makes updates any custom changes you make will not be lost. To do this you go here and download the theme.
Head to the main dashboard area as mentioned in the link, scroll down and you should see the child theme option like this:
Go ahead and click on that, which should present you with a screen like this:
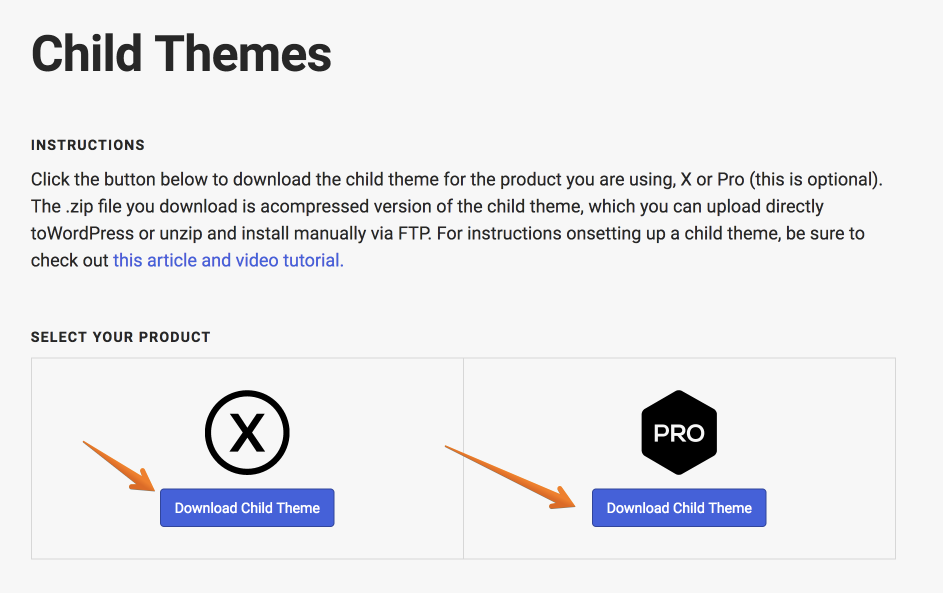
You’ll see there are two child themes, one which is for Pro and one which is for X. Hopefully you bought the X version, not the Pro one. Get the X one.
Once you’ve clicked on “Download Child Theme”, you should have a prompt to either open or save the file like this:

We want to save it, so we can upload the compressed zip later to our WordPress site, so go ahead and check saved and then click “ok”
Note: Exactly how the prompt shows will depend on your computer’s operating system, but it should be self-explanatory.
Installing The Child Theme
Now you have the child theme downloaded it’s time to install it, go ahead and open up your WordPress dashboard/admin, i.e (yourdomain.com/wp-admin) and log in. On the right-hand side click on “Appearance”, you should now have a screen like this:

As you can see in the screenshot above, there are a couple of “Add new theme” buttons, click either one.  You should have a screen like this now:

Click on “Upload theme”, then click on “browse”:

Find the child theme you downloaded in the earlier steps and select that to upload, then go ahead and click on “Install Now”:

The theme will now install, once it’s installed, go ahead and click on “activate”:

Congrats! You’ve now successfully downloaded, installed and activated your child theme, you can now safely make edits without fear of losing your modifications on a parent theme update.
Next, you can click on customise and do all sorts of things like change the font on your site, the colors you use etc. This is clearly about your brand, so figure it out! You can go to the Apex forum to ask questions from customer support.
#8 Speed optimise so readers don’t bounce
You want a fast site.
If you are smart you are probably wondering why I didn’t talk about Cloudflare and Supercacher when in SiteGround? Why isn’t there 10,000 words on plugins with things like W3TotalCache etc here? Yes, I can explain how to set these up, but you don’t want me to? Why?
Speed optimisation is a total pain in the ass. It is not worth learning. You will spend days if not weeks and still get it wrong.
I have wasted months dicking about with it. I constantly get something wrong, a conflict in my htaccess file etc and my site goes offline! Seriously. This stuff is a total mind fuck.
I have the solution for you. You may not like it though…. because you don’t understand the pain. But please, please, please do what I say.
Pay someone.
#9 Install chat on your site to engage readers
I recently added chat to this blog (you can see the gold thing in the bottom right. Say hi!) and man it was a super idea! It’s a fab way to be able to engage with users and answer any questions people have. That is a very good thing. They will also be quick to tell you when something is not working!
I highly recommend doing this!
You have a couple of options. As usual, I’m cheap. So your best, FREE option is Tawk.to. If you are cheap, use this. It’s fine, but there are better options if you pay.

Next, you have a paid product called LiveChat. Quite a lot of people use this. Frankly, it’s prettier and has more features. So if you are at the point where you don’t mind paying for another product, check it out. Intercom is of course another fab product and has a lot more use cases, but you are going to pay more. For now, I’m cheaping out. I spend enough already delivering you free content!

#10 Set up Google Analytics / Google Tag Manager
Data is great. There is no way you haven’t heard of Google Analytics (GA), or is there? Well, maybe you have but you might not know about Google Tag Manager (GTM)? Either way, you want to set this up.
You want to start with Google Analytics, but if you want to do any kind of serious marketing and tracking you need to set up GTM.
Now GA is easy to set up. Google explains here. All GA will really tell you is how many people visited you, how long etc. You get no real insight. You need GTM for this. You can make funnels and goals. If you want to make money, you need to do that.
Next, you want to get the tracking code. Install a plugin called ‘Insert headers and footers.’ See here:

This is a handy tool for coding n00bs to add code in WordPress with little effort. I also have my Facebook tracking pixel here (You want to set this up to so you can do retargeting with Facebook! Just install it now so you build up a database of people to target).
You want to paste in your tracking code here. You can see my GTM code in the header:
![]()
Now… you have probably noticed there is no massive guide here! Yeah, it’s the whole don’t bother thing again 😉
Again trust me on this. This is real experience from actually doing (and failing). I learnt EVERYTHING in this guide myself and I have gotten into none of the crazy shit.
Ok, so I was all gung-ho and was going to get my tracking on… but I started reading and said fuck this. Let’s try to find someone to teach me. After a 15min call it became obvious GTM was hard as balls. So said ‘nope, you just do this‘ to the consultant.
That consultant now works for me and does all my tracking.
I literally have done nothing.
When we first started, I gave her my passwords and said set it up… she did.
Do you know how good the feeling is to find someone who doesn’t ask any questions and just delivers?
So, back to your options here:
- Figure it out yourself… You can easily just do GA, but you want GTM and forget that
- Go to Upwork and find someone. This is 100x better than option 1
- We can ‘just do it.’ You don’t need to provide any details other than your passwords if your site is simple. It’s only $20 an hour, so in 5-10 hours your whole setup can be done. As you add more content all the tracking can ‘just be done’ as you need. She is an incredibly honest Christian, so there is no piss taking (Seriously, watch out on Upwork, you can get real losers)
Anyway, if you want all this stress magic’ed away, email me at [email protected] and we’ll get it done for you.
You want to implement marketing automation on your site, so you need tracking to see what works.
The magic process is this (this took me 2 weeks to figure out):
- Get traffic: Write awesome content people read
- Lead magnets: Make something worth downloading for an email (Every page on my blog has one on the RHS in a big black box)
- Email sequences: You get email and write email sequences that automatically send emails to users to convert them to customers. Yes, I have been shitty at doing this, but I’m learning and sharing my learnings with you as I go. I need to get better here.
Seriously, it took me ages studying top marketers to figure out that simple 3 step process from observation. Which leads us to the next step. How to do that.
But quickly, let me explain why tracking matters here. You create the lead magnets, you want to know which ones work, right? Well you need GTM to tell you. That’s the shortest, simplest explanation ever 😉 lol
#11 Implement marketing automation to build an email list
This quick guide is here as you need to start email building from day 1. I am not going to explain everything, I’m just going to tell you what to do to start now based on my weeks of research. FML.
The BIGGEST regret of top marketers is not starting building their email list earlier.
So you aren’t going to make that mistake. You are going to start immediately. Just do it ghetto style and then get better. Escalate your commitment, but start.
We are going to learn now:
- What you need to buy and why
- How I use it
Ok, you need to pay for two things. Yes, you are going to get cheap ass sticker shock, but fight it and just pay.
This is the cheap person version. If you want to know the rich kid version, ask in the comments and I’ll write a blog for you.
I spent a fricking week figuring this out. This is your basic but best stack. It is what I use. It is what top marketers use, well some buy much more expensive stuff, but if marketers who make $250k a MONTH use it, it’s prob ok for you too, right?
Ready?
These are the two things you have to buy. Here is what they do and why:
- Convertkit– This is your email, CRM and automation hub. It is the easiest tool on the market hands down. BUT, their lead gathering capabilities are really ugly so you need…
- Leadpages– You might not grok this, but you need it. You can quickly make sales pages and popups that actually don’t look like they were made by Shrek. This integrates with Convertkit so everything works in an integrated system. When you click on a ‘black box’ lead magnet on my site and you see a popup, it is leadpages. When you click on a lead magnet and it goes to a page it is… you get it.
Ok, quick explanations. I’ll write some detailed guides in future.
Convertkit
You set up Convertkit and do stuff and this is what happens.
You can send out email broadcasts (ie newsletters) and track who engages. You can resend the email to people who don’t open it at the press of a button (Which is very handy).
Here is an example of the pitch deck thinking sequence. When you sign up the system automatically mails out the content.

Here is an example of a user in the CRM. You see their basic details and the history of their interactions with you. Here Luis signed up for the free OKR, PPP and KPI tracker.

Here are two automation examples. I made a funky one to flush unengaged users. Yeah, you want to remove users that do not engage with you every few months so you only retain engaged users. This automation is pretty handy.

You create forms for each lead magnet you make. When you sign up for something on my site you double opt in. So below is the automated message that is sent out.

You can set up automation rules for everything. For example, you can create tags for users which you can use to send targeted messages. So for example when someone signs up for the free excel training course, I tag them with Excel training as a tag so I know they are interested in Excel.

Here you can see an example of the form embedded into a blog post. When people press subscribe they get added to the CRM.

There you go. Super cool. Check out Convertkit.
Leadpages
Ok, I mentioned Leadpages before. Let me quickly show you what I use it for. There are a lot of things you can do that I don’t do though.
You can build in payments, send SMS links, and integrate with Facebook…. A/B test etc. I do basic stuff, which will show you.

So you have Leadpages and Leadboxes. A leadpage is a standalone page, hosted by leadpages that has a leadbox on it. A leadbox is basically a popup you put on your site.
The benefit of a leadpage is you can churn out sales pages for all sorts of shizzle really easily.
Leadboxes are just when you want a popup on your site.
To make a page there is no coding required. You just drag and drop blocks and then type into them.

I mentioned leadpages integrates with convertkit. This is how. On each box you add convertkit and then pick the form on convertkit you want to integrate with. You HAVE to press done or it doesn’t connect (annoying, but just remember to do it). This a leadbox in a leadpage.

Here you can see an example of a leadbox I made.

There is a summary for all your pages and boxes so you can see views, conversions and your conversion rate.

You can make custom buttons to integrate a Leadbox into your site. The builder lets you create a bunch of custom code to copy and paste.

Here you can see that I made a custom yellow box and integrated it into my site. This is a leadbox, so the user signs up on the page and stays there.

So when you press the yellow button, up pops the following box. You type your email and name and it integrates with Convertkit.

#12 Write content
Now you need to write a lot of content. No shit Sherlock. Let me share some quick tips:
- I recommend you write short articles of about 500 words solving a specific problem people care about or monster articles of say 4000 words
- Always write ‘evergreen’ content which never gets old
- Pick an SEO keyword and optimise for that. You want to rank for lots of words
- Not sure what to write? Pick a blog you like, go to Buzzsumo type in the URL and you get a list of their top content. Rip off their idea. Do what works
- Use lots of images. Always add a ‘featured image,’ format stuff, make the blog easy to read
- Post your stuff on social media…
- Post consistently. You need to put out something at least once a week. Do it. you HAVE to be consistent
- Optimise your post title
- Be yourself, show personality
#13 Set up lead magnets
So you have content, now you want to get people’s emails.
Use Convertkit to embed subscribe forms into each post. You can easily change form types, but if you want to make custom formatted ones, you will need to mess about with CSS. That’s not super simple.

On each page I add a lead magnet in a black box. To do this I use two plugins.

When you click the lead magnet box, up pops a Leadbox.

This took me a looooong time to figure out.
What you need to install are the following:
Custom Sidebars enables you to control your sidebars.

The Fixed Widget lets your sidebars stay in position so when people scroll down they stay in the same place.

You add a new sidebar.

Then you go into Widgets and drag a Text box into the list of custom sidebars.
I made some code which makes this work which I copy and paste in and then edit.
You can see the code for a Leadpage. You need to get the Leadpage link and paste it in. Then you need to get the URL for your image in Media and paste in the link.

LeadPAGE code
<a href=”INSERT THE LEADPAGE LINK” target=”_blank” rel=”noopener”><img src=”INSERT YOUR IMAGE LINK” /></a>
LeadBOX code
<script src=”//static.leadpages.net/leadboxes/current/embed.js” async defer></script> <img style=”cursor: pointer;” src=”INSERT YOUR IMAGE LINK” data-leadbox-popup=”INSERT THE CUSTOM LEADBOX CODE” data-leadbox-domain=”alexanderjarvis.lpusercontent.com” />
Here is an image of the Leadbox example. You can see I have highlighted where the LeadBOX code is input.

To find the code you go to publishing options in leadpages for your form. Click on the get code to see the code. I have highlighted below where the code bit you want is.

If this seems complicated… Dude. I figured out how to do this.
You want to put opportunities to present lead magnet to your readers where they see them. Here are two examples from other bloggers:


Once you have your lead magnets set up you want to write email sequences to engage your readers. In these you want to escalate their interest so they end up buying from your startup.
If you are still with me congrats! I hope you actually did it too though?
There are a tonne of other things you might want to do. You want to generate traffic so you will need to figure out Instagram, Pinterest, SEO, Facebook retargeting… But get your blog set up first and then pick a new mountain to scale.
I hope that was super useful! Any questions hit me up in the comments.
If you know someone who would love this guide. Share the love 😉


Alexander,
Thank you very much for sharing all of this, now I am looking for 2018 to finally launch my blog.
Best from Baja, MX